
When you started researching to build your nonprofit’s first website, what did you encounter? We’d guess a bunch of unfamiliar vernacular (“Domain Name?” “Web Hosting?”), development fees that were well out of your young nonprofit’s budget and a lengthy process.
Your nonprofit’s website serves as your organization’s home on the internet, so it’s understandable that you want to get your site up and running as quickly as possible. However, it’s not worth it to rush the project, especially if you fail to set a strong foundation and have to rebuild your site from scratch a few years down the line.
At DNL OmniMedia, we work with nonprofit organizations to custom-build a site that meets their unique needs. These services are often out of range for new nonprofits building a site for the first time. This guide is here to help you create a strong foundation for your first web build project, setting you up for success a few years down the line when you’re reading to work with a consultant like Team DNL.
We’re going to cover the following topics:
- How to Create a Nonprofit Website: Frequently Asked Questions
- How to Build a Website: 5 Steps Your Team Can Take
- Why Work With A Development Agency to Complete Your Web Design Project

Too many nonprofits fall into the trap of creating a quick, just-in-time website for their organization and then quickly outgrow the site as their organization expands. Creating a strong foundation now will prevent a major overhaul in the future. Let’s get started.
How to Create a Nonprofit Website: Frequently Asked Questions
Before we dive into the steps your team can take to set your web design project up for success, let’s answer a few frequently asked questions that your nonprofit might have about this project.

What should be included on a nonprofit website?
When it comes to what should be included on your nonprofit’s website, think about the functions you want your website to serve. Informing supporters? Generating support? Raising funds? The answer is likely all of the above and more.
When examining stand-out nonprofit websites, there are a few key elements that are evident on them all:
- Informational Pages: This includes your “About Us” page and any other educational pages about your mission and organization as a whole.
- Ways to Get Involved: This includes volunteer information, fundraising opportunities (peer-to-peer sign-up pages, online donation form, etc.), advocacy opportunities, matching gift and volunteer grant information, event calendar, and more.
- Blog: This includes quick blog post updates about your nonprofit’s work, supporter and constituent testimonials, and even long-form educational posts.
- Contact Information: This includes contact information for key staff members, contact information for your headquarters, and potentially an embedded survey form to submit inquiries.
Your website is often the first location that supporters look to when they want to learn more about your organization. So, you’ll want to provide enough information for them to learn about your cause, the steps you’re taking to further your cause, and how they can pitch in. They shouldn’t need to jump through hoops to get involved but rather be able to do so as soon as they land on your website!

How much does a nonprofit website cost?
As a nonprofit professional, you’re well aware that every dollar that goes to your internal operations is one dollar less for your mission— and unfortunately, that includes the funds spent developing your website.
When it comes to building a new nonprofit website, the cost varies greatly. Depending on your nonprofit’s budget and expectations, this could simply mean the small cost of registering the domain name and hosting the website (for a do-it-yourself approach) to a more expensive bill amounting to thousands of dollars (for organizations seeking a feature-rich, custom-built website).
Generally, we recommend that nonprofits avoid a fully DIY approach and instead work with a website design consulting firm that specializes in nonprofit websites, like DNL OmniMedia. This is because modern nonprofit websites are much more than informational tools— they’re donation processing tools, volunteer and event registration tools, and even channels for direct advocacy actions.
Building out the functionality to support this extended use (online donation forms, registration forms, and more) and doing so in a secure manner requires an advanced understanding of website design, the nonprofit tech landscape, and web project management.
That said, there are steps that your nonprofit can take prior to partnering with a web development consulting firm to remove some of the work down the line and cut your project costs as a result.

How to Build a Website: 5 Steps Your Team Can Take
While we recommend working with a nonprofit website development consultant to build your site, there are steps that your team can take before establishing an official partnership to lessen your project costs overall.
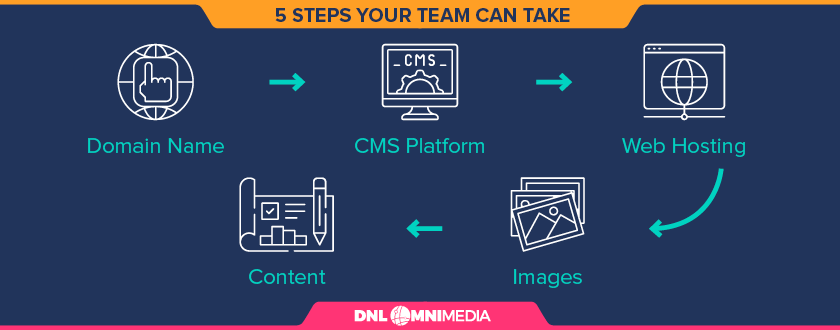
These five steps will help you plan for your first website with your organization’s future in mind, laying the proper groundwork and setting your site up for success for when you begin working with a consultant.

Web Design Project Step 1: Register your domain name.
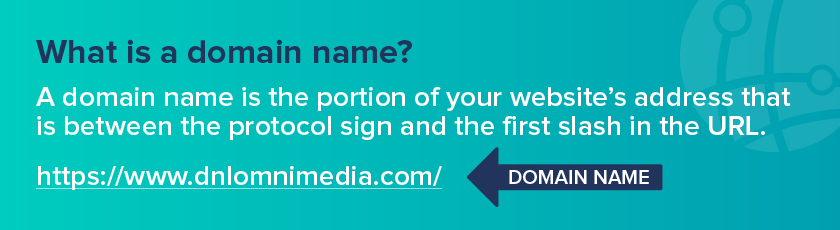
The first step in setting a strong foundation for your web build project is choosing and registering your domain name, also known as the address of your website.
More specifically, a domain name is the portion of your website’s address that is between the protocol sign (“HTTPS://”) and the first slash in the URL (“/blog,” “/about-us,” etc). For our site, the domain is “dnlomnimedia.com.”
Your domain name is what site visitors will type in each time they try to navigate to your site. Keep the following tips in mind when choosing the perfect domain name:
- Keep your domain name short and easy to remember.
- Use branded terms, such as your nonprofit’s name, to maintain brand identity.
- Avoid using numbers and hyphens, which can be challenging to remember and convey verbally to others (such as when spelling out the domain name for another to type in).
Once you’ve chosen your domain name— given that it’s available, as domain names can only be registered to one website— you’ll register the name via a domain registrar. A domain registrar is a company that manages the registration of domain names, with popular providers being Domain.com and Godaddy.com.
Domain registration costs vary but can cost approximately $14.99 per year, and often you can prepay for up to 10 years in advance. After registering your domain name, you’ll attach it to your website via the web hosting service that you work with.
It’s recommended that you choose and register your domain name as soon as possible to prevent the name from being taken. Registering your domain can be done before your website is created, so there’s no harm to registering in advance.

Web Design Project Step 2: Research CMS platforms.
After registering your domain name, the next step is to research content management systems in preparation for the early phases of working with a web development agency.
A content management system (CMS) is a web application that allows you to build and manage the content of your website, including entire pages, navigational elements, blog posts, and more.
During the discovery phase, the first step of working with a website development agency, the firm will assess requirements for your site’s functionality. With that information in mind, they will recommend a CMS that will best fit your site’s needs. When assessing your site, the agency will consider:
- Can the CMS platform serve as a base to grow your site in the future? As your nonprofit grows and your offerings expand, your website will need to accommodate the updates. It’s important to choose a CMS that can support extensive functionality and can be extended as needed for any redesign efforts down the road.
- Is the CMS easy to edit in the backend by your internal team? While we recommend working with a development agency to design your site initially, it’ll quickly get costly (and hold up your developments) if you need to do so every time a small edit is needed. Whether updating images, making a blog post, or changing text, it’s important that your team can navigate your CMS to make these small changes.
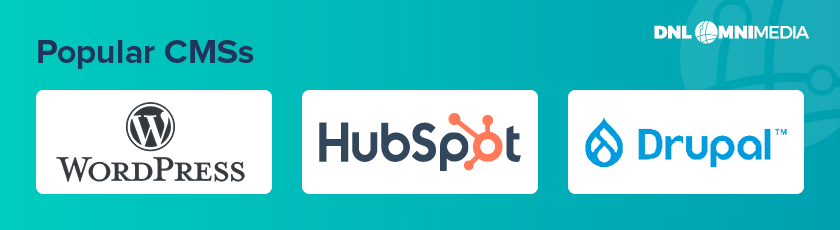
While you’ll likely want to go with the CMS recommended by the development agency, we recommend researching popular providers in preparation for this conversation. WordPress, HubSpot, and Drupal are common choices in the nonprofit sector and beyond. This is because these solutions are cost-effective and expansive, perfect for organizations building their first site with growth in mind.

Web Design Project Step 3: Research web hosting service providers.
In addition to your domain name and CMS platform, there’s one final element needed to create a home for your online presence: a web hosting service provider. A web host service is what allows your organization to post a website or web page on the internet, and is the business that provides the tech and services such as the server in which a website is hosted and the action of making web files available online.
We recommend researching and familiarizing yourself with the concept of web hosting as well as top providers in the space, prior to partnering with a development agency. While many web agencies have preferred hosting providers, it’s good to be familiar with the concept when you head into the partnership.
During the early stages of your project, the development agency will evaluate your web hosting needs, suggest a provider, and maybe even choose the hosting location to align with their preferred provider. By hosting in an environment that your web development agency is familiar with, you ensure that they can easily configure the hosting environment and conduct ongoing management. For example, at DNL OmniMedia, we don’t require organizations to use our preferred provider, but we do recommend that they do as it can improve the process of conducting ongoing management.
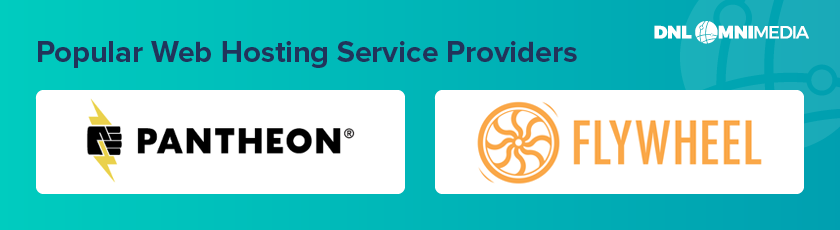
There are a variety of options available when it comes to web hosting service providers. We prefer to use Pantheon.io as we are happy with the uptime, security, and ability to manage our client websites. Another popular provider is Flywheel, which is easy to set up and straightforward for the developer to launch the site. Further, clients using this provider have been happy with the pricing and security as well.

Web Design Project Step 4: Plan and draft initial content.
Once you’ve secured the technical elements needed to begin building a site on the internet, you can begin considering your website content. While your website development consultant will eventually end up building the pages of your site, you can put that team a step ahead and save on project fees by creating drafts of your content in advance.
To draft your web pages in advance, do the following:
- Consider what pages you want to include on your website. You’ll likely want a home page, an about page, a blog roll, a donation page, an educational resources page, a volunteer page, a calendar/events page, and a contact us page.
- Create a general outline for each page. For example, an outline for your about page might include a history of your nonprofit, your mission statement, an overview of the work you do, and a list of staff and board members.
- Add content to your outline for each page. At this point, you’ll write the copy, choose images, and if able, you can create graphic design elements for each page.
The goal is to have all of the information ready so that when you begin working with a development partner, they can simply plug the information into the pages they’ve built.
However, while your team can write the copy internally, that doesn’t necessarily mean that you have high-quality images on hand to use— especially if you’re a newer nonprofit building your first website. Let’s look at how you can source these images as the final step you can take prior to working with a development agency.

Web Design Project Step 5: Secure images for the website.
Inspiring an individual to support your organization requires forging a strong emotional connection between your mission and that person. If it’s true that an image speaks a thousand words, choosing the right photos for your site can go a long way in forging that connection.
Of course, your organization can use your own images— for example, images of volunteers at work or constituents benefiting from your services— if they’re available. However, many organizations don’t have these images, especially if they’re just getting started and building their first website.
In that instance, you’ll need to purchase stock imagery to use until you have original photos available. When you work with a development agency to build your site, there are two ways this generally works:
- The agency adds a fee for purchasing stock images to the overall project costs.
- The stock image purchasing fee is already included in the design fee.
It’s worthwhile to clarify this information upfront, so your team can budget accordingly for the project overall. This is actually another reason why it’s valuable to work with a web development consultant who’s also familiar with nonprofit marketing, as this team will not only build your site but be able to choose evocative images that truly inspire your audience.
Once you’ve completed these five steps, you’ll have a strong foundation to begin working with a nonprofit web design consultant and bring your site across the finish line. Let’s walk through why your team should work with a development agency to finish building your site and the tasks this partner will complete in more detail.

Why Work With A Development Agency to Complete Your Web Design Project
A web development agency is a partner that can custom-build your nonprofit’s website to meet your organization’s unique needs. Whether prioritizing mobile-first design, crafting the ideal user experience, and completing custom coding and formatting, a web design agency can take your website beyond the premade templates in your CMS and to the next level.
There are a few reasons why the technical build of your website is likely best handled by a web development agency:
- They have extensive knowledge of the technical aspects of web development. They’ll be able to customize your site, rather than relying exclusively on the templates within your CMS platform. Further, they can ensure that more complicated design needs— such as the intricacies of nonprofit website accessibility— are accounted for.
- They can connect your site to your other technologies securely. You’ll likely want to collect information gathered on your site in your constituent relationship management (CRM) system. Further, you’ll likely want to integrate your online donation platform and volunteer management system with your website to make the most of your online presence.
- They can manage your project and ensure all deliverables are ready on schedule. This team will give you an approximate deadline, manage the project until that deadline, and ensure your site is ready to go live within a reasonable time frame.
- They may provide add-on services. Some consultants also provide nonprofit marketing and fundraising services and can develop your site with this expertise in mind.
To learn more about the benefits of working with a web development agency, check out the services offered by DNL OmniMedia. On this page, you can peruse six different web design case studies to understand the experience of working with a web development agency in depth.
So, let’s say you choose to work with a nonprofit website development firm. Here are the next steps you can expect:
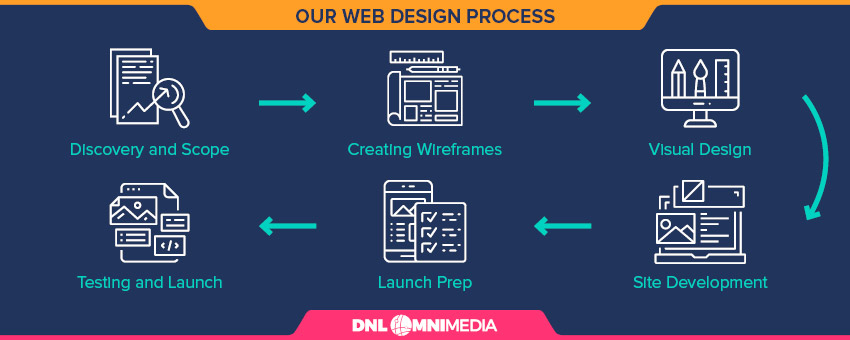
- Discovery and Scope: This step involves establishing and documenting goals, gathering the assets needed to complete the project, and developing an overall strategy and implementation plan for the project.
- Creating Wireframes: This involves creating wireframe page templates that illustrate the structure and functionality of each page. This step may not be included for websites with smaller budgets.
- Visual Design: This involves applying a design to each of the page templates. If you had wireframes created, a designer would fill in the wireframe with your organization’s visual and brand assets according to the approved page layouts. At this point, you’ll review and then approve the design.
- Site Development: The wireframes (if available) and fleshed-out visual designs are used to develop the front and back-end of your site.
- Content and Launch Prep: This is when your content is added to the site, link scanning is used to identify any navigational challenges, and a web training guide is created to ensure you can manage your site after launch.
- Testing and Launch: The site is tested on multiple web browsers and technologies before the site goes live as planned.
You can explore each of these steps in-depth in our guide to nonprofit website design projects. While these services can be more expensive than building the site on your own, it’s well worth the investment to craft a site that can stand the test of time.
To wrap up, your nonprofit’s first website development project doesn’t need to be a budget-breaking endeavor. By taking these steps on your own, you’ll set up a strong foundation for your nonprofit’s website, and future developer-assisted revamps down the line.
Once you’re ready to bring your nonprofit’s first website to the next level, contact the team at DNL OmniMedia to do so. In the meantime, check out the following additional web development resources:
- Nonprofit Web Compliance and Accessibility: The Complete Guide. Web compliance ensures that your nonprofit’s new website is accessible for all visitors, regardless of ability. Review our comprehensive guide to learn more.
- 14 Top Nonprofit Websites to Inspire Your Organization. Are you seeking inspiration for your nonprofit’s first web build project? Check out our list of the top nonprofit websites.
- Nonprofit Website Design Projects: The Comprehensive Guide. Wondering what it’s like to work with a nonprofit website development agency? Review our guide for a full look at Team DNL’s process.